Mould Testing – NATA Accredited Laboratory
Accurate Mould Testing, Reliable Results for Mould Samples Analysis by SESALAB Fast turnaround

Mould Testing Laboratory – NATA Accredited
We provide NATA accredited mould testing services for indoor mould samples.
SESA operates SESALAB, a NATA accredited mould testing laboratory. SESALAB is the first laboratory to become accredited in Australia for mould analysis to the following ASTM Standards:
- ASTM D7391-17e1 – Standard Test Method for Categorization and Quantification of Airborne Fungal Structures in an Inertial Impaction Sample by Optical Microscopy
- ASTM Standard Designation: D7658 – 17 Standard Test Method for Direct Microscopy of Fungal Structures from Tape.
SESA provide professional mould assessment and mould testing services to the following client categories:
- Insurance, loss adjusters, real estate and legal firms
- Schools, hospitals/health care facilities, retirement villages, libraries, museums
- Building, renovation and demolition firms
- Civil and environmental works contractors
- Certified mould remediators and building restoration firms
- Homeowners and commercial/industrial building managers.
Sampling Airborne Mould & Analysis by Direct Microscopy Examination
The investigation of mould contamination in the indoor environments may include the collection of air samples for direct microscopy examination for fungi (non-viable), air samples for fungal cultures (viable), or both. A sampling plan is required before collecting the samples with clear goals, purpose and relevance of the sampling to answer questions for the investigation and to support field observations. Results are used to evaluate conditions of the building rather than evaluating health risks, although excessive levels identified for certain mould may be used as indicative of potential health risks for occupants and specifically for mould sensitive individuals.
The use of direct microscopy examination air sampling results are generally used to ascertaining whether the two environments from which samples have been collected are different regarding fungal spore presence and thus pointing to a problem within an area of the building.
The approach for sampling typically involve collecting and comparing indoor versus outdoor samples. Based on on-site environmental conditions, the assessor is usually trying to determine whether any significantly elevated fungal levels are occurring indoors
that are different or unusual when compared with the outdoor microbial flora. Investigations also compare levels of fungi in complaint/concern versus non-complaint/non-concern areas in the indoor environment.
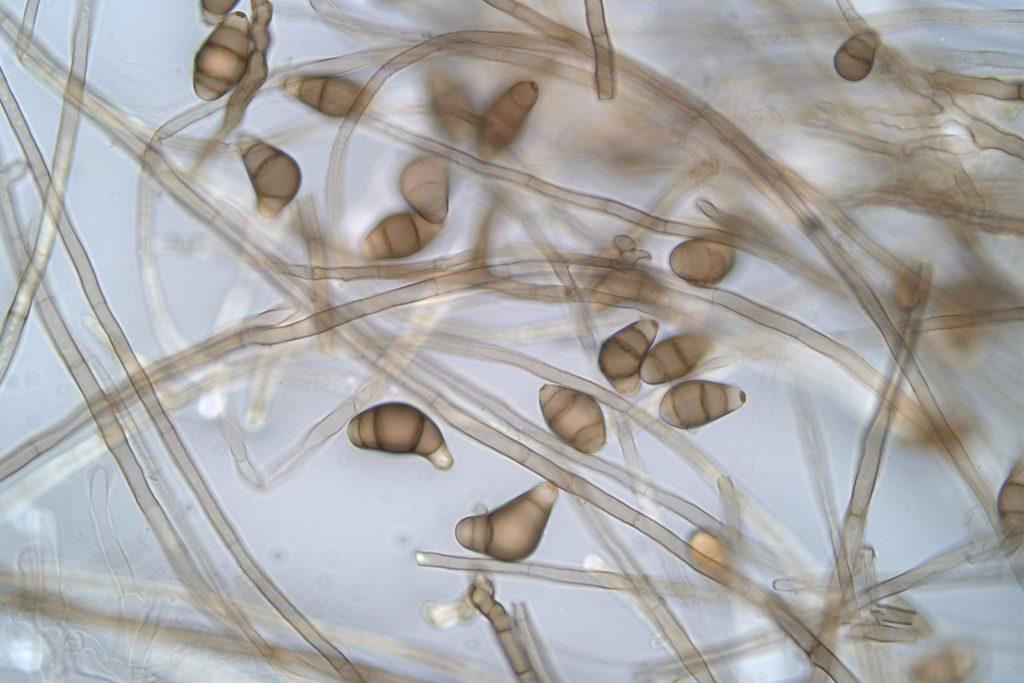
When analysing direct examination samples, fungi are identified using microscopical techniques to examine spores, hyphae (long, branching filamentous structure of a fungus) and other fungal structures captured by the air sampling cassette. Fungi may be identified to the genus level by this method. Although spore trap sampling for direct examination is not recommended in investigations that involve infectious fungal agents (because fungal culture/species identification would be required), such sampling and analysis can be used in evaluating levels of specific airborne allergens (e.g., fungal spores, fungal hyphae, pollen grains).
Variables that could affect the sampling include conditions indoors and outdoors prior to and during the sampling. These may include:
- Type, operation, cleanliness and maintenance of the heating, ventilation and air conditioning (HVAC) system. Notably older systems are prone to mould contamination
- HVAC outdoor air supply rate and building air exchange rate
- Outdoor conditions, including season, weather, wind speed and wind direction, nearby activities (eg. construction work)
- General cleanliness of the indoor space
- Building envelope condition, such as windows or doors being open or closed, manhole cover removed, cracks in walls and ceilings
- Type, density and activity of occupants within the area(s)
- Processes undertaken and occupant use.
Procedure For Sampling Airborne Mould for Direct Examination
The following procedure may be referred to as a guide for sampling airborne mould:
- Collect the following samples as appropriate for the assessment to enable appropriate detection of mould and identify problem area(s) and/or potential occupants’ exposure:
- Outdoor background (or HVAC fresh air intake point for mechanically ventilated building) sample(s) as a reference for comparison with indoor sample(s)
- Indoor sample(s) from problem/complaint area(s)
- Indoor sample(s) from non-problem/complaint area(s)
- Where required, wall/ceiling cavity sample(s)
- Where required, subfloor sample(s)
- Samples may be collected under non-activity time, activity time or under disturbed conditions (eg. briefly using air blower, vacuum cleaner, etc.)
- For naturally ventilated building, samples to be collected after the area was closed and not supplied with natural ventilation for at least 4 hours
- For mechanically ventilated building, samples can be collected with and/or without the operation of the HVAC system as determined required by the sampling strategy and the required assessment.
Sample Duration and Sample Air Volume
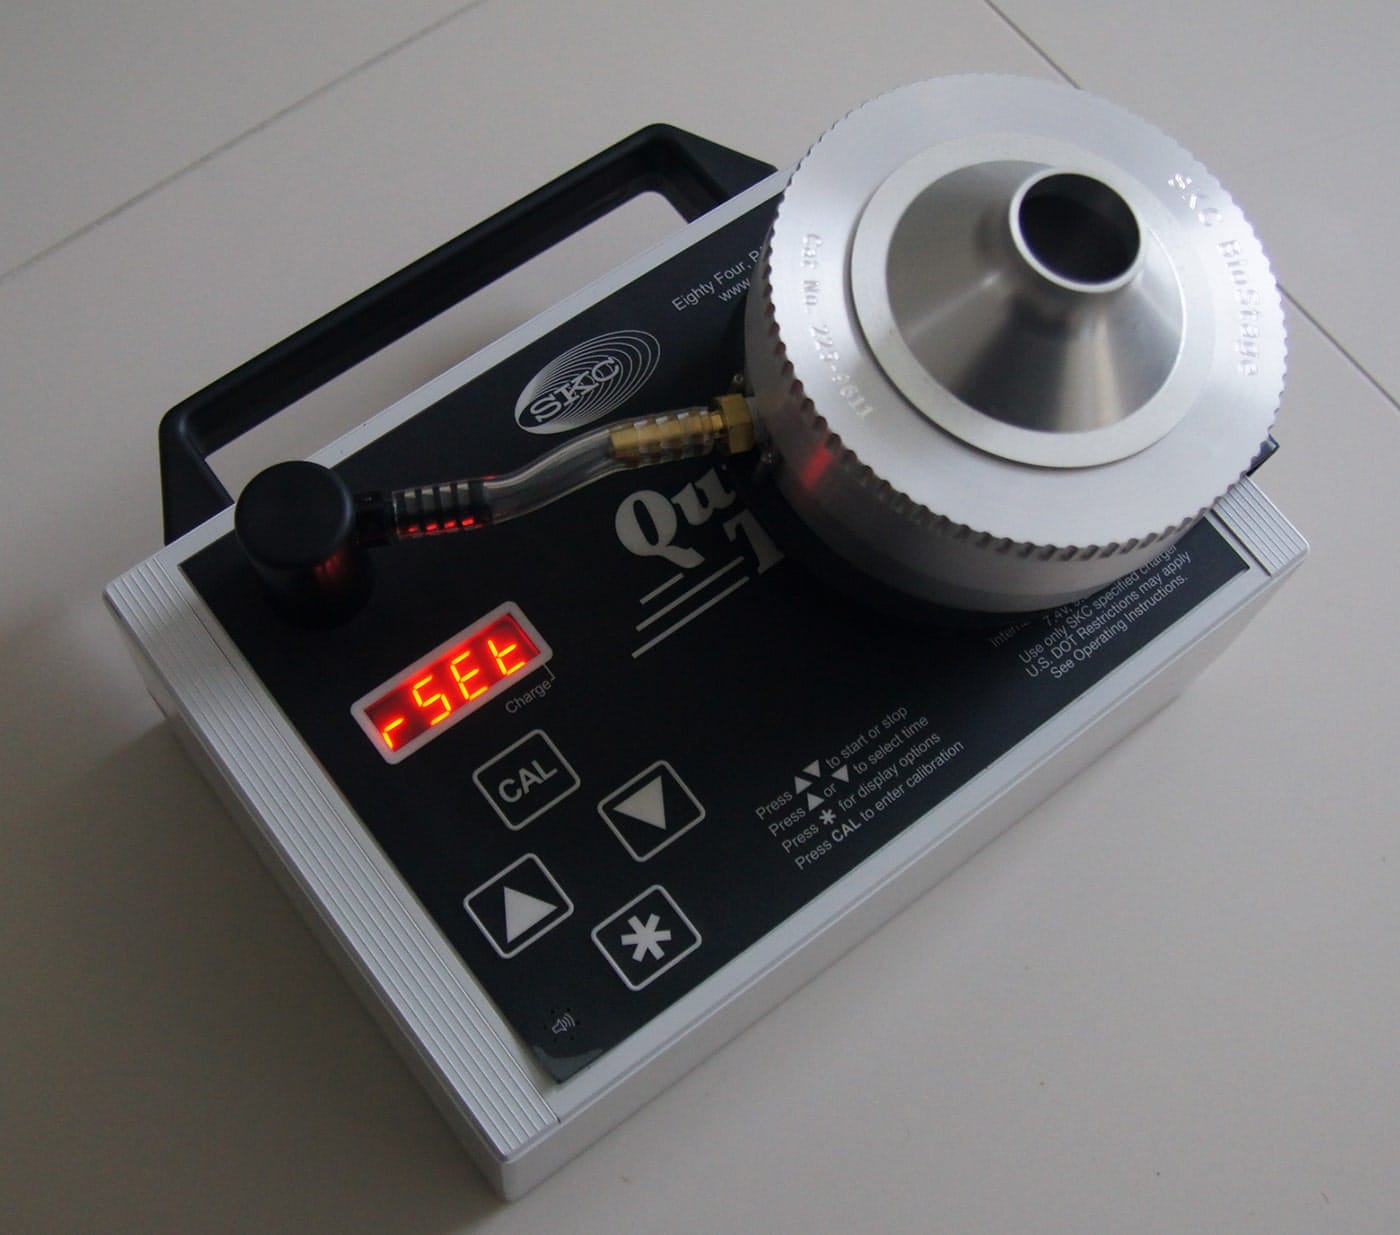
- The air sampling pump (eg. Zefon Bio-Pump, QuickTake 30, etc.) is to be calibrated to run at 15 litres per minute (L/m) using a rotameter calibrated to a primary standard or directly by a primary or secondary flow meter. Some pumps only work with specific calibration devices. Refer to the pump manual to verify if any special calibration methods should be employed. The pump flow rate to be checked immediately prior to the sampling, between samples and at the completion of the sampling at the site to ensure the flow rate is within ±5% between samples. Record results on chain of custody
- The recommended sample duration by various cassette manufacturers and from operational experience:
Table 1: Sample Duration for Various Locations & Environmental Conditions
Sampling Location / Condition |
Sample Duration Minutes |
Flow Rate Litres/minute |
Sample Air Volume Litres |
|---|---|---|---|
Outdoor sampling on a windy day
|
5
|
15
|
75
|
Outdoor sampling on a clean windless day
|
10
|
15
|
150
|
Clean office environment or outdoors (no visible dust)
|
10
|
15
|
150
|
Indoor environment, high activity personnel
|
5
|
15
|
75
|
Indoor environment, evidence of renovation, or heavy industrial dust
|
1
|
15
|
15
|
Indoor environment, visible dust emissions from point sources present
|
0.5
|
15
|
7.5
|
Inner wall sampling (if dust is visible in cassette collect another sample)
|
0.5-1 minute
|
15
|
7.5-15
|
Subfloor sampling
|
2 minutes
|
15
|
30
|
- Label the cassette with job number/sample number and note location
- Place monitor on between 1.5 to 2.0 meters above ground level where possible or at head height of a standing or a seated person (as applicable) in the area being sampled
- Remove the tape seals covering the inlet and outlet of the spore trap (Air-O-Cell, Allergenco-D, etc.) and place them on the side of the cassette. Then connect the cassette to the sampling pump either directly or using flexible tubing for extended distance if required. Turn the sampling pump on for an appropriate sample time ranging from 1 to 10 minutes and both seals replaced after sampling is complete
- Record the following into chain of custody form:
- Sample number
- Pump number
- Location
- Flow rate, sample duration and sample air volume
- Rotameter number
- Job number, client and the type of sampling conducted.
- Place cassettes in a sealable bag to transport to laboratory.
Would You Like to Know More
About Our Services
Call us today on 02 9822 8406, email us , or use our online enquiry form for further information about our services, to arrange an obligation-free
phone consultation or to discuss your requirements with us.
Procedure for Sampling of Surface Mould on Tape for Direct Microscopy Examination
This procedure aims to provide consistent methodology for sampling fungal structures (spores and fungal hyphae) on surfaces for the identification of mould genera by direct microscopic examination.
Tape sampling is the most common technique used to test surfaces for mould during a mould inspection. It provides valuable information. The identification of the mould genera present, their occurrence in indoor environments and in water damaged buildings, the relative degree of contamination, and the potential for airborne spore production may all be determined by tape sampling.
The method can be performed using either standard, clear cellophane tape or a packaged kit specifically designed for mould sampling such as Zefon Biotape or Fungi Tape. The tape lift method can also be applied to sample bulk materials contaminated with mould sent to the laboratory and to swabs used to sample mould from surfaces. The sampling involves direct contact to visible mould (IICRC Condition 3) or non-visible dispersed mould (IICRC Condition 2) to evaluate surface contamination and assist in planning for remediation.
Tape sampling is used for qualitative rather than quantitative analysis. Tape sampling can aid in the identification of mould, but cannot accurately determine the scope and severity of the mould problem that requires visual evaluation by the mould inspector or assessor.
Principle of Sampling
The tape or a slide prepared with adhesive is pressed against the sampled surface in order to collect the sample, which is then sent to a laboratory for analysis. This method is non-invasive and will not damage materials or surfaces, when performed properly. Depending on the material, tape samples can be obtained from the surfaces of valuable furnishings and materials of historical provenance that have visible fungal growth, usually without risk of damage.
Sampling Using The Bio-Tape™ System
The Bio-Tape™ system is one of the most popular tape sampling and collection products on the market. It consists of a flexible, plastic microscope slide with an adhesive area. The slides come packed in their own individual mailers and are provided with unique serial numbers for traceability and documentation. A center-line marker on the slide aids the user in locating the center when taking the sample and also aids the laboratory analyst in finding the center of the sample. The Bio-Tape is compatible with both optical microscope and scanning electron microscopy (SEM).
Sampling Procedure
- The use of personal protective equipment is recommended, including gloves and a P2 half face respirator, because tape sampling requires direct contact and minor disturbance of mould-contaminated areas
- Do not sample if disturbance of mould is likely to release mould indoors and cause uncontrolled exposure to occupants or the sampler. If controlled conditions are available such as local containment and HEPA vacuum sampling may proceed
- Remove slide from provided slide mailer
- Document the sample location on the slide label and on the laboratory chain of custody
- Peel off protective liner from slide to expose adhesive
- Place slide with the adhesive side down on the surface to be sampled. (Use the centering line to orient the adhesive over the exact sample location desired)
- Gently press down to ensure contact is made. Do not press down hard. The adhesive is very tacky and only needs to be pressed gently
- Carefully remove slide from surface and place back into slide mailer. Do Not replace the plastic “Peel” liner
- Send slide to laboratory for analysis.
Note: Multiple samples should be collected from both suspect and non-suspect (control) areas for comparison.
Sampling by Tape Lift
- Tape Lift sampling is a simple technique, that is often used to collect settled dust sample from surfaces like floor, furniture, walls and even carpets.
- Tape lift samples are usually examined by light microscopy for mould, fibres, biological materials, insects and other particles found in dust.
- The use of personal protective equipment is recommended, including gloves and a P2 half face respirator, because tape sampling requires direct contact and minor disturbance of mould-contaminated areas
- Do not sample if disturbance of mould is likely to release mould indoors and cause uncontrolled exposure to occupants or the sampler
- To collect a Tape Lift sample, use Transparent Tape or Fungi Tape. You also need a Ziploc bags, a permanent marker, and the chain of custody form.
- It is important to use a transparent tape, which is clear even under high magnification and does not interfere with analysis.
- Scotch tape (even if it looks similar to a transparent tape) is not suitable for sampling. The Scotch tape is made opaque by blending mineral dust into film which makes this tape a poor choice for microscopy. Packaging tape does not work either due to glue formulation, which contains dust interfering with analysis.
- Take 4-5 cm long piece of the clean transparent tape
- Hold it with one or two hands. The sticky side of the tape is facing the surface from where the sample should be taken. Touch the surface with a tape
- The dust is imprinted on the tape and the sample is ready for laboratory analysis
- Open a new Ziploc bag, insert the tape with dust sample into a bag, and gently press the sticky surface of the tape against the inner surface of the bag
- Close the bag. Label it with the marker with sample number (eg. 1555/S1), enter sample location, date and other details into the chain of custody form and send to laboratory for analysis.


Types of Mould Samples for a Professional Mould Assessment
Where required, depending on the questions to be answered and the purpose of the mould assessment one or more of the following common types of mould samples may be collected from the site:
- Airborne mould spores (non-viable) collected on spore trap (usually 5 minutes sample duration). Samples are analysed by direct microscopy to identify mould genera and total mould spores count. Air sampling within wall cavities is very useful in detecting hidden mould sources
- Airborne mould (viable) collected on agar plates (usually 2-5 minutes sample duration). Samples are incubated for 7 days and then analysed for identification of mould genera or species if possible and colony forming units
- Surface biotape samples (lift-off tape). Samples are analysed by direct microscopy to identify mould genera and total mould spores count
- Surface swabs (viable mould) collected on cotton tipped swabs or agar press plates. Samples are incubated and then analysed for viable mould by identification of mould genera or species and colony forming units
- Surface Contact Plates (viable mould). Samples are incubated and then analysed for viable mould by identification of mould genera or species and colony forming units
- Bulk samples of contaminated materials that can be analysed by direct microscopy method or if required by re-suspension and plating for detecting viable mould.
- Environmental Relative Mouldiness Index (ERMI) or HETRMI-2 samples. Mould in surface dust or in carpet. Dust is sampled and analysed for mould by qPCR (DNA analysis). This method is an excellent mould screening technique that is species specific and very useful in expert cases. However, interpretation of results requires high level of training and skills and is not recommended by the US EPA for routine sampling rather for research purposes
- Other types of samples are also used depending on the established requirements.
- Occupational Hygiene Services
- Indoor Air Quality Testing
- Dust Air Monitoring
- Silica Dust Air Monitoring
- Workplace Noise Surveys & Assessment
- Workplace Audiometric Testing
- Mould Inspection, Testing & Assessment
- Mould Testing | NATA Accredited Laboratory
- Mould Post Remediation Verification Testing
- Mould, Yeast & Bacteria Air Testing
- Cleanroom Air Testing
- Meth Residues Testing
- Mould Hygienist
- Asbestos Hygienist
- Occupational Hygienist Expert Reports


- Contact Us
Get A Quote
- Contact Us